|
|
|
|
مواقع
مفضله
Let's
now see how a timer works. What is a timer? It's exactly what the word says: an
instruction that waits a set amount of time before doing something. As
always, different types of timers are available with different manufacturers.
Here are brief descriptions of the most common:
Let's
now see how to use them. We typically need to know 2 things: 1.
What will enable
the timer. Typically this is one of the
inputs (a sensor connected to input 0000, for example). 2.
How long we want to
delay before we react. Let's wait 5 seconds
before we turn on a solenoid, for example. When
the instructions before the timer symbol are true, the timer starts
"ticking." When the time elapses, the timer will automatically close
its contacts. When the program is running on the PLC the program typically
displays the elapsed or "accumulated" time for us so we can see the
current value. Typically, timers tick from 0 to 9999 in
10 and 100 msec increments. Shown
below is a typical timer instruction symbol we will encounter (depending on
which manufacturer we choose) and how to use it. Remember that, although they
may look different, they are all used basically the same way. If we can setup
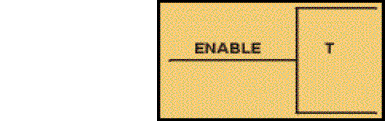
one, we can setup any of them. Figure
19. Timer Symbol
This
timer is the on-delay type and is named T. When the enable input is on the timer
starts to tick. When it ticks Y (the preset value) times, it will turn on its
contacts that we will use later in the program. Remember that the duration of a
tick (increment) varies with the vendor and the time-base used (i.e., a tick
might be 1ms or 1 second etc.). It's
important to note that, in most PLCs, counters and timers
can't have the same name because they typically use the same registers.
A
counter is a simple device intended to do one simple thing: count.
Using them, however, can sometimes be a challenge because every manufacturer
seems to use them a different way. What
kinds of counters are there? Well, there are up-counters
(they only count up 1,2,3...). There are down counters
(they only count down 9,8,7,...). There are also up-down
counters (they count up and/or down 1,2,3,4,3,2,3,4,5,...) Typically
a high-speed counter is a "hardware" device. The normal counters
listed above are typically "software" counters.
In other words, they don't physically exist in the PLC but instead are simulated
in software. Hardware counters do exist in the PLC and are not dependent on scan
time. To
use them we must know 3 things: 1.
Where the pulses
that we want to count are coming from. Typically
this is from one of the inputs (a sensor connected to input 0000, for example). 2.
How many pulses we
want to count before we react. Let's count
5 widgets before we box them, for example. 3.
When/how we will
reset the counter so it can count again. After
we count 5 widgets let's reset the counter, for example. When
the program is running on the PLC, the program typically displays the current or
"accumulated" value for us so we can see the current count value. Typically,
counters can count from 0 to 9999, -32,768 to +32,767 or 0 to 65535. Why the
weird numbers? Because most PLCs have 16-bit counters. 0-9999 is 16-bit BCD
(binary coded decimal) and -32,768 to 32767 and 0 to 65535 is 16-bit binary. In
this counter we need 2 inputs. One goes before the reset line. When this input
turns on the current, (Accumulated) count value will return to zero. The second
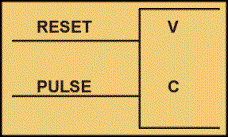
input is the address of the pulses we are counting. Figure
18. Counter Symbol
For
example, if we are counting how many widgets pass in front of the sensor that is
physically connected to input 0001 then we would put normally open contacts with
the address 0001 in front of the pulse line. C
is the name of the counter. If we want to call it counter 000 then we would put
"C000" here. V is the number of pulses we want to count before doing
something. If we want to count 5 widgets before turning on a physical output to
box them we would put 5 here. If we wanted to count 100 widgets then we would
put 100 here, etc. When the counter is finished, it will turn on a separate set
of contacts that we also label C. Note
that the counter-Accumulated value ONLY-changes at the off to on transition of
the pulse input.
|
|
تصميم المهندس : محمد صبري محمود فهيم إستعداد تام لتصميم المواقع إستعداد تام للعمل داخل أو خارج مصر E-Mail: Mohamedmsm@Masrawy.com |